Discover Features
Know how to Unlock Efficiency, Streamline Workflow, and Boost Productivity
General settings
General settings page contains multiple configuration options categorized under 5 different tabs. Please review the settings page for a complete list, as each configuration includes helpful explanatory text. Additionally, each module/gadget offers specific configurations to tailor your experience.
General Tab
- Display Date and Time format: This field allows you to define the default date and time format applied throughout the tool.
- Displayed hours: Select the hour range between 00:00 to 23:00 (24 hours format). This range is useful for focusing on the calendar view of the worklog calendar module.
- Working hours: Highlight your working hours in the worklog calendar for better visibility.
- Working days: Highlight your selected workdays in various gadgets, reports, and the worklog calendar.
- Start of week:Define the starting day of your week for better organization. If not selected, the default will be used.
Time Tracker Tab
The Time Tracker Tab is dedicated to configuring the specific functionalities of the time tracking feature. Here, you can fine-tune default settings that align with your expectations for timer behavior.
- Minimum time spent (HH:MM): This setting defines the minimum required duration to generate a worklog. If you stop the timer before reaching this configured time, the recorded activity won't generate a worklog. For instance, if you set the minimum time as 5 minutes and stop the timer at 4 minutes, no worklog will be created.
- Round tracked time: Configure rounding rules for the tracked hours. Rounding helps standardize worklog entries. For example, you can round 47 minutes to 50 minutes or 1 hour. It streamlines time tracking by aligning entries with common intervals like 15 or 10 minutes.
- Pause time tracker when system is locked: Selecting this checkbox automatically pauses the timer when your system is locked. When you unlock your system, the timer resumes. This ensures accurate tracking of active working time. This feature enhances precision in tandem with the rounding option. Note: Currently, this feature is exclusive to the Browser Extension and not available for Web or Cloud app users. Environmental factors might impact its effectiveness.
- Pause time tracker when system is idle: Similar to pausing on system lock, this option suspends the timer when your system enters an idle state. However, the idle threshold aligns with the browser's default settings. Like the previous option, the effectiveness of this feature relies on various environmental configurations.
- Attach tracker functionality within Jira: This checkbox integrates time tracking into Jira. Upon enabling, you can start, pause, and stop the timer directly from your sprint, kanban board, or individual issues. Icons for these actions will be added to each issue, providing seamless control over time tracking.
- Show timer in Jira: Activate this checkbox to display the timer in Jira and Confluence pages. Once started, the timer appears in the bottom-right corner of Jira and Confluence pages. If the timer's visibility disrupts your work, you can use this option to hide it.
- Delay attaching functionality: This field lets you specify a delay in seconds before attempting to attach the timer functionality to Jira pages. If Jira page loading is slower in your browser, increasing this delay improves the likelihood of successful attachment.
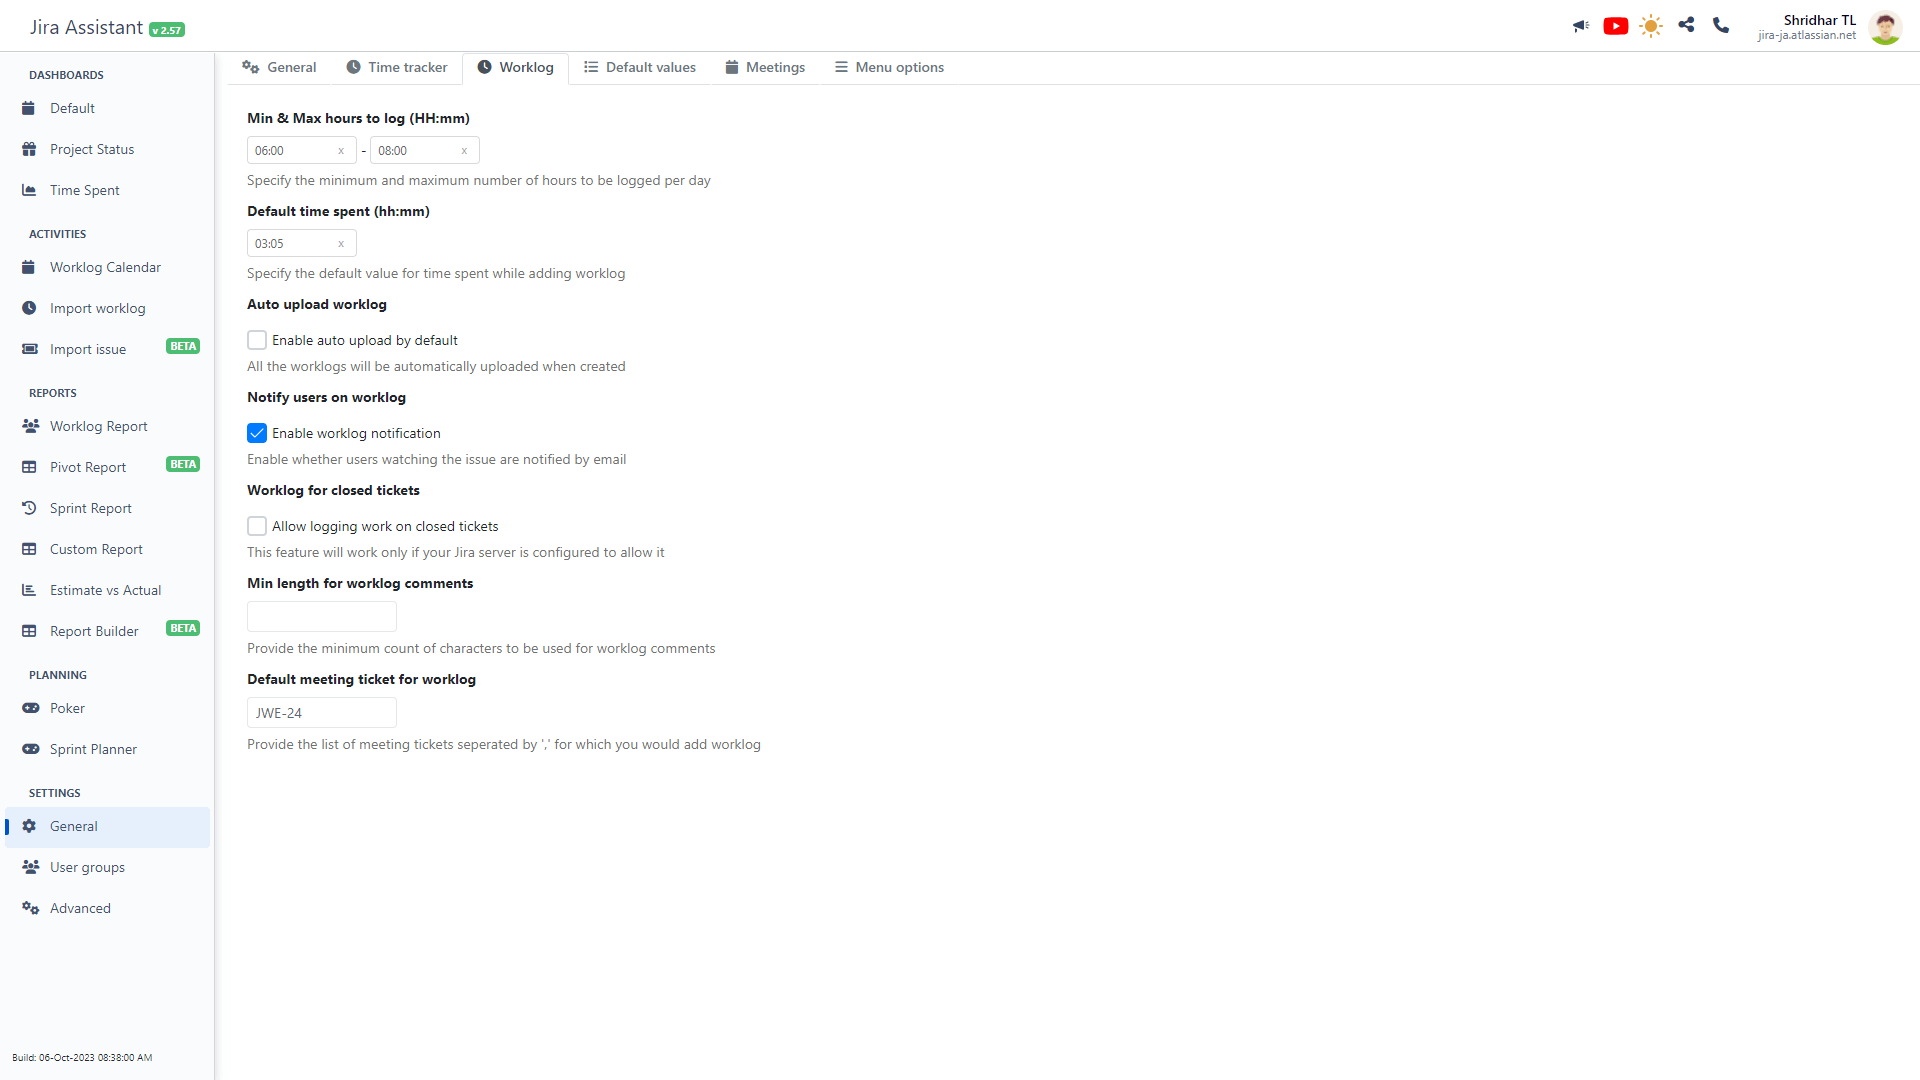
Worklog Tab
The Worklog Tab enables you to finely adjust the behavior of worklog-related features. Tailor these settings to harmonize worklog management with your workflow requirements.
- Min & Max hours to log (HH:mm): Define the minimum and maximum hours allowable for daily worklog entries. These limits serve as visual indicators in gadgets and reports, helping you monitor compliance.
- Default time spent (hh:mm): Establish a default time value for new worklog entries. This pre-populated value simplifies the entry process and optimizes efficiency.
- Enable auto upload by default: By default, worklogs aren't automatically uploaded to Jira, enabling users to review it before pushing to Jira. Toggle this setting to enable automatic upload upon creation, streamlining the submission process.
- Notify users on worklog: Control the default notification behavior for worklogs. By activating this checkbox, you can customize the notification settings according to your preference.
- Allow logging work on closed tickets: Override the default restriction that prevents worklog entries on resolved/closed tickets. Enable this option for more flexibility in capturing your work efforts.
- Min length for worklog comments: Set a minimum comment length requirement for worklog entries. This practice encourages comprehensive entries, providing valuable context for future reference.
- Default meeting ticket for worklog: Simplify worklog creation for meetings by specifying a list of meeting tickets. This feature enhances integration with Outlook or Google Calendar, streamlining time tracking.
Default Values Tab
The Default Values Tab empowers you to streamline your workflow by configuring default values for essential fields. These defaults will be seamlessly integrated across various modules, enhancing efficiency throughout the tool.
- Projects: Add and manage the projects that are central to your work. By populating this list with your relevant projects, you simplify report generation, as these projects will be readily available across all modules, eliminating the need for repetitive selection.
- Agile boards: Strategically select the agile boards that are pivotal for your sprint reporting. By pre-configuring these boards, you ensure accurate and efficient sprint-related insights.
- Story Points field: Harness the power of custom fields in Jira by specifying the appropriate field for Story Points. This selection fuels Story Points-related functionality within JA. If you encounter disabled Story Point functionality, this likely indicates an unselected field. Note that JA attempts to auto-select the field when you access this page for the first time, potentially enabling previously disabled features.
- Epic name field: Similar to the Story Points field, the selection of the Epic Name field influences features tied to epics. By thoughtfully choosing from the dropdown, you ensure the smooth operation of epic-related functionalities.
Meeting Tab
The Meeting Tab offers seamless integration between your Outlook or Google Calendar and JA, enhancing your productivity. Leverage this integration for automated worklog generation or to launch meeting URLs automatically, guided by your configurations.
Explore the array of configurations available within this tab, each designed with self-explanatory guidance, facilitating a streamlined setup process.
Menu Option Tab
The Menu Option Tab offers you a tailored experience by configuring the behavior of the JA browser extension icon click. This feature exclusively caters to browser extension users and isn't available for Web or Jira Cloud app users. It empowers you to define your preferred mode of accessing JA with a single click.
What should happen when clicking on JA icon?
Under this title, you'll encounter three radio buttons, each providing distinct configurations for the JA icon click action.
- Option 1 - Show Menus: The default choice, this option grants you control over the displayed menus upon clicking the JA icon. Select this to configure the menus you want to be visible. You'll find an additional field titled "Menus to Display" where you can choose the most frequently used module. This personalized menu will expedite navigation to your selected module.
- Option 2 - Auto Launch: Ideal for users who often access a specific module like the Worklog Calendar. Choose this option to bypass the menu list. Upon selection, a dropdown of modules will appear. Pick the desired module, and clicking the JA icon will automatically load that module, eliminating the need for a secondary click.
- Option 3 - Show Quick-view Dashboard: This feature presents a powerful but lesser-known facet of JA. When you opt for this choice, you can configure a designated dashboard to appear as a popover when you click the JA icon. Within this dashboard, all the added gadgets are organized in a tabbed layout, offering immediate insights without navigating away. Though underutilized, this option holds tremendous potential for efficient multitasking.
Tailor your JA experience with this tab's versatile configurations, optimizing your workflow and boosting your productivity.